Battery switch on travel trailer function is crucial for managing your RV’s power. Understanding how these switches work – whether single-pole, double-pole, or dual battery – is key to preventing battery drain and extending the life of your batteries. This guide breaks down everything you need to know, from installation and wiring to troubleshooting and maintenance, ensuring you’re equipped to handle any electrical situation on the road.
We’ll cover different switch types, their pros and cons, and provide step-by-step instructions for installation and maintenance. You’ll learn how to diagnose common problems, like corroded connections or blown fuses, and gain confidence in keeping your travel trailer’s electrical system running smoothly.
Types of Battery Switches in Travel Trailers
Choosing the right battery switch for your travel trailer is crucial for managing your power effectively and preventing potential electrical issues. Different types of switches offer varying levels of control and protection. Understanding their differences will help you select the best option for your needs.
Battery switches act as the gatekeepers of your trailer’s electrical system, allowing you to isolate and control the flow of power from your batteries to various appliances and systems. They’re essential for preventing accidental drain, managing multiple battery banks, and ensuring safe operation.
So, you’re planning a trip? Awesome! First things first: get travel insurance sorted. Check out Aon travel insurance for solid coverage. Then, if you’re hitting the road in an RV or travel trailer, knowing how your battery switch on travel trailer function works is crucial for avoiding a dead battery and a ruined vacation.
Seriously, understanding that switch is a game-changer for your off-grid adventures!
Single-Pole Battery Switches
Single-pole switches are the simplest type. They control the power flow from a single battery to the trailer’s 12-volt system. They are typically used in trailers with just one battery.
A single-pole switch is a basic on/off switch, offering minimal control but simple operation. Think of it as a simple light switch for your battery.
Double-Pole Battery Switches
Double-pole switches provide more control by allowing you to isolate two separate battery banks (like a house battery and a starting battery) independently. This offers greater flexibility in managing your power sources.
This type of switch allows you to connect either battery to the trailer’s 12-volt system, or both simultaneously, or to disconnect both completely. This is beneficial for managing the charge and discharge of different battery types or preventing one battery from draining the other.
Dual Battery Switches
Dual battery switches are designed specifically for trailers with two batteries. They usually offer three positions: “Both,” “Battery 1,” “Battery 2,” and “Off.” This allows you to select which battery or combination powers the trailer’s system.
These switches offer a convenient way to switch between batteries, ensuring you have a backup power source and the ability to isolate batteries for maintenance or charging.
Comparison of Battery Switch Types
| Switch Type | Description | Advantages | Disadvantages |
|---|---|---|---|
| Single-Pole | Controls power from a single battery. | Simple, inexpensive, easy to install. | Limited control, only suitable for single-battery setups. |
| Double-Pole | Controls power from two separate battery banks independently. | Greater control over power sources, prevents cross-drain between batteries. | More complex than single-pole switches, slightly more expensive. |
| Dual Battery | Specifically designed for two batteries, offering “Both,” “Battery 1,” “Battery 2,” and “Off” positions. | Convenient selection of power sources, good for managing two distinct battery banks (e.g., starting and house batteries). | Primarily suited for two-battery systems, may be overkill for single-battery setups. |
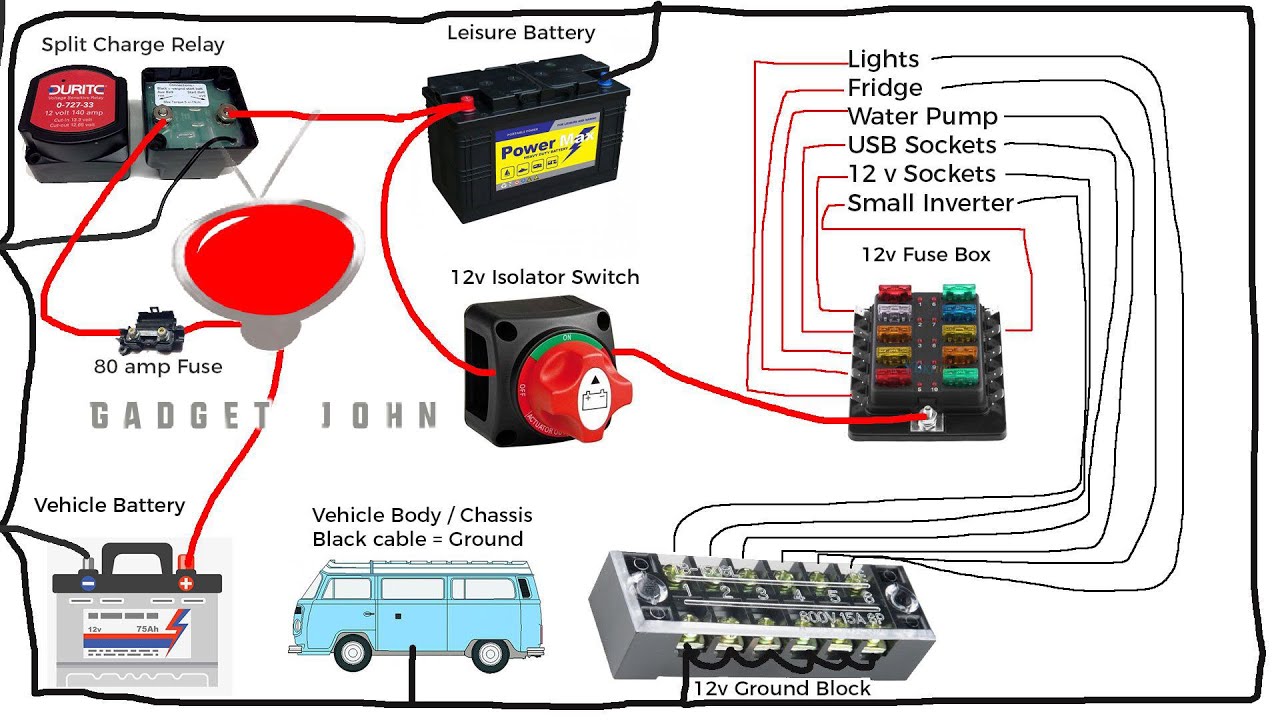
Wiring and Installation of Battery Switches
Installing a battery switch in your travel trailer is a crucial step in managing your power system. It allows you to isolate your house batteries from the chassis battery, preventing accidental drain and protecting your investment. This process requires some basic electrical knowledge and careful attention to safety. Improper installation can lead to electrical shorts, fire hazards, and damage to your RV’s electrical system.
This section details the typical wiring diagram and step-by-step installation process for a common battery switch setup. We’ll also cover important safety precautions and best practices for creating a reliable and safe connection.
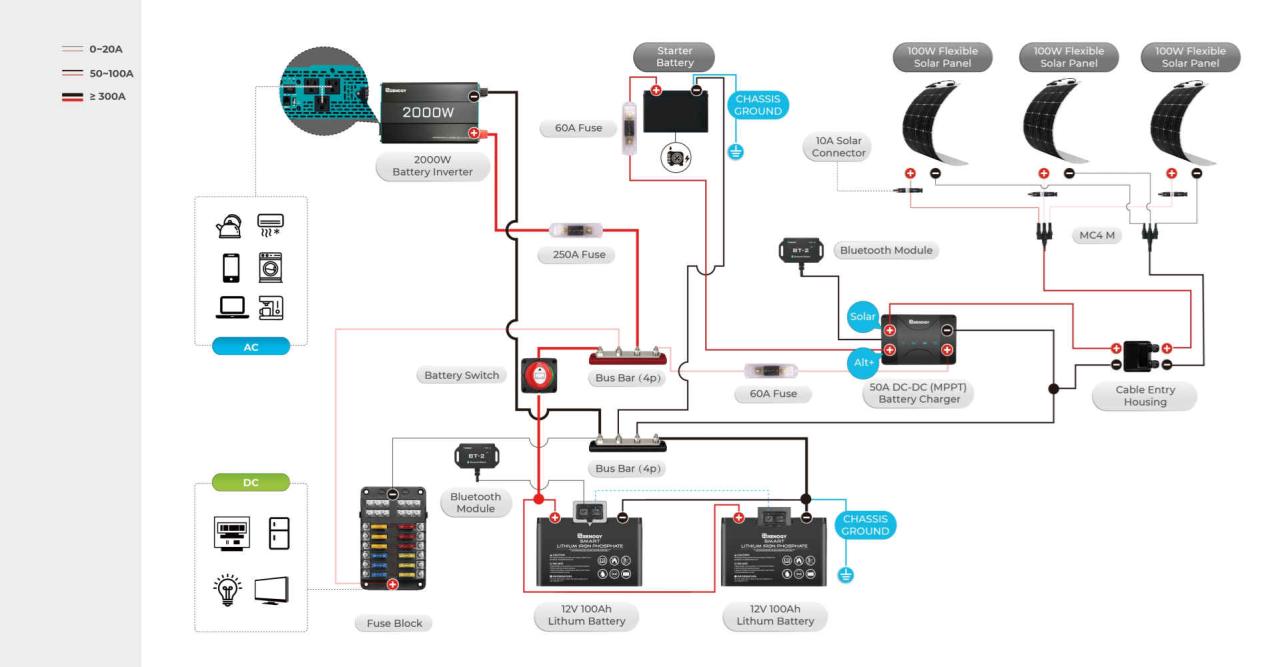
Basic Wiring Diagram for a Travel Trailer Battery Switch
A typical setup involves a battery switch connecting your house batteries to the trailer’s 12V system. This allows you to disconnect the house batteries from the rest of the system, preventing discharge when the trailer is not in use. The diagram below illustrates a simplified setup. Note that the specific components and their arrangement might vary depending on your RV’s electrical system and the type of battery switch used.
Imagine a diagram showing: A positive (+) terminal on the house battery bank, connected via a heavy-gauge wire to the input terminal of a battery switch (typically labeled “Battery”). Another heavy-gauge wire runs from the output terminal of the battery switch (labeled “Load”) to the positive bus bar of the trailer’s 12V distribution panel. A similar arrangement exists for the negative (-) terminals, with a wire connecting the negative terminal of the house battery bank directly to the negative bus bar of the distribution panel.
A separate, smaller gauge wire runs from the negative terminal of the battery switch to the negative bus bar. This ensures that even when the switch is off, the negative terminal of the battery is still grounded.
Installing a Battery Switch: A Step-by-Step Guide
Before beginning any electrical work, always disconnect the negative terminal of your house battery bank. This is a critical safety precaution to prevent accidental shorts and shocks. Use appropriate safety equipment, including insulated gloves and safety glasses.
- Choose a suitable location: Select a location for the battery switch that is easily accessible, well-ventilated, and protected from the elements. Avoid locations near heat sources or where the switch could be accidentally damaged.
- Mount the switch: Securely mount the battery switch using appropriate hardware. Ensure the switch is firmly attached and will not vibrate loose during travel.
- Connect the positive wires: Using heavy-gauge wire appropriate for the amperage of your battery bank, connect the positive (+) terminal of your house batteries to the “Battery” input terminal of the switch. Connect the output terminal of the switch (“Load”) to the positive bus bar of your 12V distribution panel. Crimp and solder all connections, ensuring a clean, secure connection. Use heat-shrink tubing to protect the connections from moisture and abrasion.
- Connect the negative wires: Connect the negative (-) terminal of your house battery bank directly to the negative bus bar of your 12V distribution panel. Connect a separate wire from the negative terminal of the switch to the negative bus bar. This completes the grounding circuit.
- Test the installation: Reconnect the negative terminal of your house batteries and test the system. Ensure the battery switch functions correctly and all appliances are working as expected.
Best Practices for Wiring and Grounding
Proper wiring and grounding are essential for a safe and reliable battery switch installation. Using the correct gauge wire is crucial to prevent overheating and potential fire hazards. A properly grounded system helps to prevent electrical shocks and protects your electrical components.
- Use appropriately sized wire: The wire gauge should be sufficient to handle the amperage draw of your battery bank and appliances. Consult a wiring chart to determine the correct gauge.
- Use crimp connectors and solder: Crimp connectors provide a secure mechanical connection, and soldering adds additional strength and conductivity. Always use heat-shrink tubing to protect the connections from moisture and abrasion.
- Ensure a clean ground connection: A clean and secure ground connection is crucial for safety and proper system operation. Use a heavy-gauge wire for the ground connection and ensure it is firmly connected to a clean metal surface on your RV chassis.
- Use appropriate fuses or circuit breakers: Install fuses or circuit breakers to protect your wiring and components from overloads and short circuits. Ensure the fuses or circuit breakers are rated for the appropriate amperage.
Troubleshooting Common Battery Switch Issues
Dealing with a malfunctioning battery switch in your travel trailer can be frustrating, but systematic troubleshooting can often pinpoint the problem quickly. Understanding the common issues and how to address them will save you time and potential headaches on the road. This section Artikels the most frequent problems and provides clear steps to help you get back up and running.
So, you’re planning a trip? Awesome! First things first: get travel insurance. Check out Aon travel insurance for some solid options; it’s super important for peace of mind. Then, if you’re hitting the road in a travel trailer, understanding the battery switch on travel trailer function is key. Knowing how to manage your power will keep your adventures running smoothly.
Get those two things sorted, and you’re practically set for an amazing journey!
No Power to Appliances
This is the most common issue. It means the battery switch isn’t connecting the battery to the trailer’s electrical system. This could be due to several factors, from a simple switch problem to a more serious wiring fault.
- Check the Switch Position: Ensure the switch is firmly in the “on” position. Many switches have multiple positions (e.g., battery only, shore power only, both). Make sure it’s set to the position that should provide power to your appliances. A visual inspection is key here; look for any signs of damage or looseness.
- Inspect the Switch Itself: Look for any visible damage to the switch. Cracked casing, loose knobs, or burnt components are clear signs of a faulty switch requiring replacement. A detailed visual inspection might reveal internal damage, even if the exterior appears intact.
- Test the Battery: Use a multimeter to check the battery voltage. A reading near 12.6 volts (when not charging) indicates a good battery. A significantly lower reading suggests a dead or failing battery, which would prevent power even if the switch is working correctly.
- Examine Wiring Connections: Carefully check all wiring connections at the battery switch. Look for loose wires, corrosion (green or white powdery substance on the terminals), or broken wires. A corroded connection appears dull and often has a greenish-white buildup on the metal. This buildup prevents proper electrical contact.
- Check Fuses: Inspect both the fuses at the battery switch and the main circuit breaker panel in your trailer. A blown fuse will appear visibly broken, with a melted filament. Replace any blown fuses with fuses of the correct amperage.
Blown Fuses, Battery switch on travel trailer function
Blown fuses indicate an overload in the system, potentially caused by a short circuit or a device drawing too much power. Ignoring blown fuses can lead to more serious damage.
- Identify the Blown Fuse: Locate the blown fuse(s). They will usually be clearly marked. A blown fuse will have a broken internal filament, often visible through the clear plastic casing.
- Determine the Cause: Before replacing the fuse, try to determine why it blew. This might involve checking for shorts in the wiring or identifying a faulty appliance that’s drawing excessive current.
- Replace the Fuse: Replace the blown fuse with a fuse of the
-exact* same amperage rating. Using a higher amperage fuse is dangerous and can lead to a fire. - Monitor the Fuse: After replacing the fuse, monitor it closely. If it blows again immediately, there’s a persistent short circuit that needs to be addressed by a qualified technician.
Corroded Connections
Corrosion significantly impedes electrical conductivity, leading to reduced power or complete failure. It’s often caused by moisture and exposure to the elements.
- Identify Corroded Connections: Look for a dull, greenish-white powdery substance on the battery terminals, wires, or switch connections. This corrosion inhibits the flow of electricity.
- Clean the Connections: Use a wire brush or sandpaper to carefully clean the corroded areas. For stubborn corrosion, a battery terminal cleaner may be helpful. Make sure to clean both the male and female connectors thoroughly.
- Apply Corrosion Inhibitor: After cleaning, apply a corrosion inhibitor or dielectric grease to the cleaned connections to prevent future corrosion. This creates a protective barrier and improves conductivity.
- Tighten Connections: Ensure all connections are securely tightened. Loose connections can contribute to corrosion and poor electrical contact.
Battery Switch Selection and Upgrading
Choosing the right battery switch for your travel trailer is crucial for safe and reliable power management. The wrong switch can lead to power failures, damage to your batteries, or even fire hazards. This section will guide you through selecting and upgrading your battery switch to meet your specific needs.Selecting the appropriate battery switch involves careful consideration of your trailer’s electrical system.
Factors like the number of batteries, amperage draw of your appliances, and the type of batteries used all play a significant role in determining the correct switch. Upgrading an existing switch might be necessary if you’ve added more appliances, switched to higher-capacity batteries, or simply want improved functionality and safety.
Factors to Consider When Selecting a Battery Switch
Several key factors influence the choice of battery switch. Ignoring these could lead to an inadequate or unsafe system. The most important considerations are the number of batteries, the amperage rating, and the type of switch.
- Number of Batteries: A single battery system requires a simple on/off switch, while dual battery systems need a switch capable of isolating or combining the batteries. Larger setups with more batteries require more complex switching arrangements. For example, a two-battery system needs a switch with at least two outputs, allowing independent control of each battery or their combined power.
- Amperage Rating: The switch’s amperage rating must exceed the maximum current draw of your electrical system. Underestimating this can lead to overheating and potential fire hazards. Consider the combined amperage draw of all your appliances, including the air conditioner, refrigerator, and lights. A higher amperage rating provides a safety margin and longer lifespan.
- Switch Type: Common types include simple on/off switches, rotary switches, and electronic switches with digital displays and remote control capabilities. The choice depends on your needs and budget. Rotary switches offer greater control over battery combinations, while electronic switches provide sophisticated monitoring and control features.
Factors to Consider When Upgrading a Battery Switch
Upgrading your battery switch might be necessary to accommodate increased power demands or improve safety. Before upgrading, carefully assess your current system’s limitations and future needs.
- Increased Power Demand: Adding more power-hungry appliances (e.g., a larger air conditioner or an inverter) might require a switch with a higher amperage rating.
- Improved Safety: An older switch might be worn or unreliable. Upgrading to a more robust switch with better safety features is a worthwhile investment.
- Enhanced Functionality: A basic switch can be upgraded to one with features like a digital display showing battery voltage or remote control capabilities for easier operation.
Comparison of Battery Switch Brands and Models
Several reputable brands offer a range of battery switches for travel trailers. Direct comparisons are difficult without specific model numbers, but some general features to consider include amperage rating, switch type, mounting style, and additional features (e.g., voltmeter, remote control). Research specific models from brands like Blue Sea Systems, Perko, and Xantrex to find the best fit for your needs and budget.
For example, Blue Sea Systems offers a wide range of high-quality switches known for their durability and reliability, while Perko is known for its marine-grade switches suitable for harsh environments. Xantrex provides more technologically advanced switches with digital displays and remote monitoring capabilities.
Safety Considerations with Battery Switches
Working with batteries and electrical systems in your travel trailer requires careful attention to safety. Improper handling can lead to serious injury from electric shock, burns, or even explosions from leaking battery gases. Understanding and implementing proper safety procedures is crucial for preventing accidents and ensuring a safe RVing experience.Incorrect installation or operation of a battery switch can create dangerous situations.
For instance, a poorly wired switch might lead to short circuits, overheating, and potential fire hazards. Similarly, accidentally connecting the batteries in reverse polarity can damage your trailer’s electrical system and potentially even start a fire. Always double-check your connections before turning on any power.
Safe Disconnection and Reconnection of Battery Cables
Before working on any part of your trailer’s electrical system, always disconnect the battery cables. This is a fundamental safety precaution that prevents accidental shocks and short circuits. The process involves several steps. First, turn off all electrical appliances and systems within the trailer. Then, locate the battery’s negative (-) cable (usually black).
Using a wrench, carefully loosen the nut securing the cable to the battery terminal. Next, remove the negative cable. Repeat this process for the positive (+) cable (usually red). Remember, always disconnect the negative cable first and reconnect it last. This minimizes the risk of accidental short circuits.
When reconnecting, reverse the process, connecting the positive cable first and then the negative cable.
Personal Protective Equipment (PPE)
Working with batteries and electrical systems necessitates the use of appropriate personal protective equipment (PPE). Safety glasses or goggles protect your eyes from sparks or corrosive battery acid splashes. Rubber gloves insulate your hands from electrical shocks and protect them from battery acid. Wear sturdy closed-toe shoes to protect your feet from potential hazards. Furthermore, consider working in a well-ventilated area to mitigate the risks associated with battery gases.
These gases, such as hydrogen, are flammable and can be hazardous to your health.
Preventing Sparks and Short Circuits
To prevent accidental sparks and short circuits, keep the battery terminals and cables clean and free of corrosion. A build-up of corrosion can impede electrical flow and lead to overheating. Use a wire brush or a battery terminal cleaner to remove any corrosion before connecting or disconnecting the cables. Also, ensure that all connections are tight and secure.
Loose connections can create resistance, leading to heat build-up and potential fire hazards. Avoid dropping any tools or metal objects onto the battery terminals, as this could create a spark and ignite flammable gases.
Emergency Procedures
Knowing what to do in case of an emergency is vital. If you experience a short circuit, immediately disconnect the battery cables using the procedures Artikeld above. If a fire occurs, attempt to extinguish it using a fire extinguisher rated for electrical fires (Class C). If the fire is too large or you are unsure how to proceed, evacuate the area immediately and call emergency services.
Always keep a fire extinguisher readily accessible in your RV. Remember that battery acid is corrosive; in case of a spill, neutralize it with baking soda and water, and clean the area thoroughly.
Mastering your travel trailer’s battery switch is more than just knowing how to flip a switch; it’s about understanding your RV’s electrical system and ensuring reliable power wherever your adventures take you. By following the advice and troubleshooting tips in this guide, you can confidently maintain your system, prevent costly repairs, and enjoy worry-free travel. Remember, regular maintenance and understanding the basics are your keys to a smooth and powered-up journey!
Expert Answers: Battery Switch On Travel Trailer Function
What size wire should I use for my battery switch?
The wire size depends on the amperage of your battery and the length of the run. Consult a wiring chart to determine the appropriate gauge for safe operation. Using too small a gauge can lead to overheating and fire hazards.
How often should I clean my battery switch?
Inspect your battery switch at least once a year, and clean it as needed. Look for corrosion and clean with a wire brush and baking soda solution. Apply a corrosion inhibitor afterwards.
My battery switch is stuck. What should I do?
Try lubricating the switch mechanism with a penetrating lubricant. If it’s still stuck, you may need to replace the switch. Don’t force it, as you could damage the switch or surrounding components.
Can I use a battery switch with lithium batteries?
Some battery switches are compatible with lithium batteries, but others are not. Check the manufacturer’s specifications to ensure compatibility. Using an incompatible switch could damage your lithium batteries.
